This brief guide will outline several basic processing and analysis methods. For further instruction, please refer to the NIH’s ImageJ user guide.
To download Fiji, go to https://imagej.net/Fiji and scroll until you see the download section. Determine the appropriate download for your operating system. If you are unsure if you have a 64 bit or a 32 bit OS, type “See if you have a 32-bit or 64-bit OS” into your computer’s search bar or go to Computer Settings > About. Look under device specifications and system type.
Opening Images:
Note: Standard ImageJ will not open .czi files (or any other proprietary life science files) without the Bio-Formats plugin. To ensure your image will open, use Fiji rather than standard ImageJ.
- To open a single channel image, go to File > Open and select your desired image. If the image is a life science image file, the bio-formats window will open. Use these setting to open your image:
- Ensure the image is opened as a Hyperstack.
- Open with color mode: “Colorized“
- Ensure Autoscale is selected, which increases the brightness and contrast of an image by adjusting the range of light intensity within an image to match the range of possible display values. Note that Autoscale does not change your data, only how it is displayed.
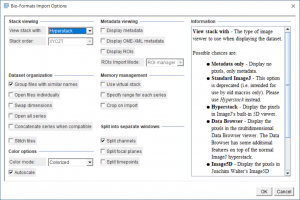
- To open a multi-channel image, open your image the same way as a single channel and choose to “Split Channels”. Splitting channels allows you to alter the channel color, if necessary. You can re-merge the channels later if desired. Ensure that the channels are colored correctly, as Fiji can occasionally misread the metadata.
- To open a Z-stacked image, ensure you are splitting channels if a multi-channeled Z-stack.
Adding a scale bar: Go to Analyze > Tools > Scalebar. Since this creates an overlay of the scale bar, you need to combine your image and the overlay by going to Image > Overlay > Flatten.
Changing image type: Some microscopes create a higher quality 16-bit image, but 8-bit images work best to allow you to view them on your computer without any analysis software. To change your image, go to Image > Type and select desired type.
Color Processing: Make sure the selected channel or image is the primary window.
- To pseudocolor the image, go to Image > LookUp Table and select desired color.
- To merge several images, go to Image > Color > Merge Channels. Determine which image will be which channel (red, green, blue, cyan etc.) and merge using the dropdown menu. Select keep source images to keep original images open.
- To split channels, go to Image > Color > Split Channels.